

Showing posts with label learn. Show all posts
Showing posts with label learn. Show all posts
Monday
Tuesday
How to: Create a Blog
This tutorial will walk you through the steps of starting your own blog. Blogging is a fantastic outlet for people of all interests ~ from politics to crafting, there are massive genres existing in the world of blogging. There are also several popular platforms and the most common are Blogger, Wordpress, Tumbler, and Typepad. I began like most on Blogger because it was a free and easy to use interface. While times have changed a bit since those early days, Blogger still stands as an excellent platform for bloggers.
To begin blogging you'll first need to select a title and link for you blog. While bloggers do try to keep the title and link of their blogs the same, it isn't entirely necessary, so if you find that the name you want to use is taken then consider using your own name or a modification of that for your link, such as www.sharonwrites.blogspot.com. Now that you've given the title some thought, let's begin.
The tutorial below is a combination of my own tutorial and one published on wikiHow. I'd like to thank the contributors for their additional images and content. source link: http://www.wikihow.com/Start-a-Blog-on-Blogger
1. Begin by visiting www.blogger.com/home, where you will be prompted to log-in to your Google account. All Blogger blogs are associated with a Google account. If you don't have one then you will need to create a new account...


You can use anything you like for the title, since this can be changed at any time.


18. You can even use Html to write your blog posts if you know this web developing language...


To begin blogging you'll first need to select a title and link for you blog. While bloggers do try to keep the title and link of their blogs the same, it isn't entirely necessary, so if you find that the name you want to use is taken then consider using your own name or a modification of that for your link, such as www.sharonwrites.blogspot.com. Now that you've given the title some thought, let's begin.
The tutorial below is a combination of my own tutorial and one published on wikiHow. I'd like to thank the contributors for their additional images and content. source link: http://www.wikihow.com/Start-a-Blog-on-Blogger
1. Begin by visiting www.blogger.com/home, where you will be prompted to log-in to your Google account. All Blogger blogs are associated with a Google account. If you don't have one then you will need to create a new account...
2. On the next page you will need to confirm your profile information and click "Continue to Blogger"...
3. On the next page you will fill in your Blogger display name and click "Continue to Blogger"...
4. Once logged in you will be redirected to the Blogger home page...
This page will show a list of your blogs and a list of the blogs you follow, if any.
5. To create your first blog click the gray "New Blog" button...
6. On this page you'll select a blog "Title", "Address", and a template.
You can use anything you like for the title, since this can be changed at any time.
For the address you'll need to play around, since Blogger has been around for a long time you may find the title you want is not available. You can use a combination of your actual name and what you do ~ I used sharons-artblog.blogspot.com, and it doesn't have to match your blog title. Try some different combinations until you find one that works. You'll see a blue check when you've found an address that's available...
7. Next you'll choose a starter template, which will act as the basic design/layout of your blog. I recommend using the "Picture Window" because it's easily modified for my free blog elements and designer blog themes...
8. Click "Create blog"...
9. Now
you’ll be taken back to the Blogger home page where you’ll see your new blog
appear at the top of the page. Click on
the title of your new blog to access the back end…
10. On the next screen you'll see an overview of the control area where you can personalize your blog and set up basic options...
11. Using the "Template" link, gives you access to change the template and other visible features of your blog. You can control the layout, width, text, colors, and so much more...
12. Click on the "Customize" button to enter the "Template Designer" area and play with these settings...
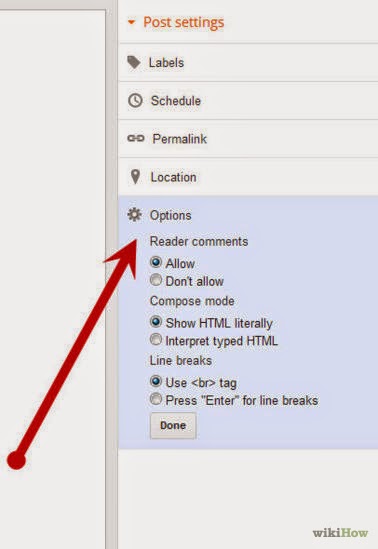
13. The "Settings" area allows you to control the functionality of your blog such as who is able to view your blog, contribute to it, and comment on your blog. Click this link to explore this area further...
14. You can adjust publishing, comments, archiving, permissions, and all the other settings for your blog within the sub areas of the "Settings" tab.
15. To write your first blog post click the orange "New post" button found on at the top of the sidebar area...
16. Always begin by titling your blog posts ~ this is a key feature to enabling search features, archiving, and visitors to easy find and sort your blog posts...
17. Next click in the large box space, this is where you will write your blog posts content. You can add text, pictures, videos, etc. Hover over each icon to view a pop-up key word of what each function is...
19. On the right sidebar are more key features, such at "Labels"; single words that describe your posts and "Options" which allow comments and other interactivity for your individual posts...
20. Once you've finished writing your blog post, click the "Publish" button and your blog post will be live on your blog...
That's it! Congratulations on setting up your new blog! You can find more helpful tutorials on customizing your blog by visiting the Tutorials section of my blog. I also offer a more in-depth video tutorial on writing a blog post at this link: How to: Write Your First Blog Post
Enjoy~
How to: Install a Blog Badge (or add an Html Sidebar Gadget)
This tutorial will cover the steps for installing a sidebar gadget that using html or java script code. It's a simple but important process as it allows you to easily install badges, buttons and widgets from all of the internet. Whether it's my own blog badge, a fellow blogger's button, or one of those nifty gadgets, the few steps involved are quite useful in helping us create our own blog space.
To use this tutorial you'll need to have a sidebar item selected that uses Html code. For example purposes we'll use my own blog badge seen below but you can also find a wide range of free inspirational sidebar buttons from this page: http://www.prl-images.com/blog_buttons.html

To install this badge on your own blog you'll need "grab" the code or "copy" it and "paste" it into an Html/Java Script gadget. If you need help understanding or practicing how to copy and paste with your mouse I recommend following along with this easy video tutorial: http://www.youtube.com/watch?v=mXRT2YH8EDM The most important thing to remember when copying and pasting html code is that if you loose a snippet of code it may affect how the button appears so be sure to "grab" all of the code.
So let's begin...
1. Begin by logging into your blog, and click "Design"...

2. Now navigate to the "Layout" section of your blog...

In this area you can see a skeletal view of your blog. Looking over the various sections you'll see the navigation bar, "Header" area, "Blog Posts" area, and any sidebars you have setup on your blog. This is where you can easily install, move around, and remove various gadgets for your blog. Clicking on "Add a Gadget" enables you to access a wide range of built-in gadgets that Blogger offers it's user.

So let's go on and access this area...
3. Click on the "Add a Gadget" link in the sidebar area of your blog...

4. You'll see a small window up...

This is where you can access all of the built-in add-ons that Blogger offers.
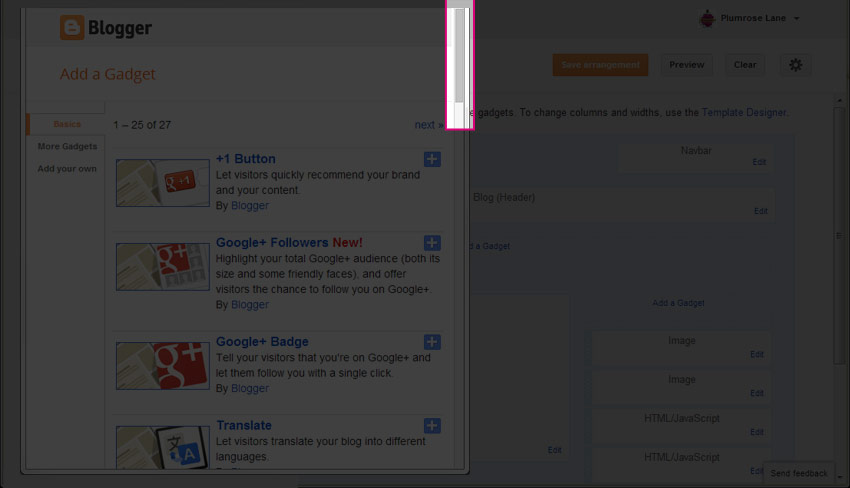
5. We're going to be using "HTML/Java Script" gadget so using the scroll bar, scroll down until you see that option...


6. Now click on either the title or the blue + button...

In this area you'll now see where we can title your gadget and paste in any Html or Java Script code.
7. Going back to the code from my own blog badge at the beginning of this tutorial, copy the Html code and paste it into the large rectangle as shown below...

When I'm working with a lot of sidebar gadgets, I find it easier to temporarily title new ones so I can easily move them to their final location so let's do that too while we're here...
8. Type a simple title in, something easy like "new button" works and you can always change this or delete it later...

9. With that completed we can now click "Save"...

10. You will now see your new gadget present on your blog's Layout...

Now let's reposition this new gadget so we can remove that temporary title...
11. By clicking on the gadget with your mouse, you can easily drag the object to a new location within your layout...

12. Choose where you would like to place your new button and then click the "Save arrangement" button...

13. With that done, you can click on the "Edit" link within your new gadget to remove the temporary title...

14. Just be sure to click "Save" to keep your change...

15. Your new gadget will now be titled by it's default gadget title...

16. That's it! Congratulations ~ you've now added an Html/Java Script gadget! You can click the "View blog" button to view your new item...
Enjoy~
To use this tutorial you'll need to have a sidebar item selected that uses Html code. For example purposes we'll use my own blog badge seen below but you can also find a wide range of free inspirational sidebar buttons from this page: http://www.prl-images.com/blog_buttons.html
To install this badge on your own blog you'll need "grab" the code or "copy" it and "paste" it into an Html/Java Script gadget. If you need help understanding or practicing how to copy and paste with your mouse I recommend following along with this easy video tutorial: http://www.youtube.com/watch?v=mXRT2YH8EDM The most important thing to remember when copying and pasting html code is that if you loose a snippet of code it may affect how the button appears so be sure to "grab" all of the code.
So let's begin...
1. Begin by logging into your blog, and click "Design"...

2. Now navigate to the "Layout" section of your blog...

In this area you can see a skeletal view of your blog. Looking over the various sections you'll see the navigation bar, "Header" area, "Blog Posts" area, and any sidebars you have setup on your blog. This is where you can easily install, move around, and remove various gadgets for your blog. Clicking on "Add a Gadget" enables you to access a wide range of built-in gadgets that Blogger offers it's user.

So let's go on and access this area...
3. Click on the "Add a Gadget" link in the sidebar area of your blog...


This is where you can access all of the built-in add-ons that Blogger offers.
5. We're going to be using "HTML/Java Script" gadget so using the scroll bar, scroll down until you see that option...

6. Now click on either the title or the blue + button...

In this area you'll now see where we can title your gadget and paste in any Html or Java Script code.
7. Going back to the code from my own blog badge at the beginning of this tutorial, copy the Html code and paste it into the large rectangle as shown below...

8. Type a simple title in, something easy like "new button" works and you can always change this or delete it later...

9. With that completed we can now click "Save"...

10. You will now see your new gadget present on your blog's Layout...

Now let's reposition this new gadget so we can remove that temporary title...
11. By clicking on the gadget with your mouse, you can easily drag the object to a new location within your layout...

12. Choose where you would like to place your new button and then click the "Save arrangement" button...

13. With that done, you can click on the "Edit" link within your new gadget to remove the temporary title...

14. Just be sure to click "Save" to keep your change...

15. Your new gadget will now be titled by it's default gadget title...

16. That's it! Congratulations ~ you've now added an Html/Java Script gadget! You can click the "View blog" button to view your new item...
Enjoy~
How to: Push (or Center) a Blog Header
This tutorial is to serve as an alternative to my other tutorial titled How to: Center a Blog Header. Although that method works well in most cases, it can fail to center if used with other enhanced template features so if you find your banner image is not centering properly then go ahead and give this simple method a try. The code below is not meant to be used in combination with any other code for centering a header so be sure to remove any prior "banner centering code" before moving forward.
To use this tutorial you will need to have a banner already loaded onto your blog. If you need help installing a blog banner then follow this tutorial: How to: Install a Blog Header.
With a banner in place you are ready to move forward with "pushing" your blog header, so let's begin...
1. Log-in to your blog click on the "Design" link in the top right corner link list...

2. This should bring you directly to the "Template" page, in the left links list...

3. Click on the "Customize" button...

4. We are now in the "Template Designer" area...

This interface offers you the ability to easily change aspects of your blog. We will be adding some code to the "Advanced CSS" area so let's navigate to that area...
5. Click on "Advanced" at the bottom of the left link list...

6. Now using the scroll bar...

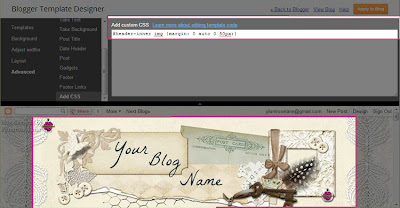
7. Scroll down the inner link list until you see "Add CSS"...

8. Click on that link to be taken to the CSS area...

If you've previously inserted any CSS code then you will see it present in this area. If you have not then this area will be empty on your blog.
9. Now copy the code from the scrolling box below...
10. And paste it into the CSS area...

and you should see your banner image immediately shift to the right.
11. If you wish to move it over further to the right or left you can easily do this by either increasing or decreasing the last number in the code. So, if the setting is at "0", then your banner will be all the way to the farthest left position it can go...

12. And if you increase the number to say "100", then you will see your banner image move way over to the right side...

13. Personally, I think somewhere between 30 - 50 works best but test it out and see what looks best on your own blog....
14. Once you have your banner image set where you want it, then save your changes by clicking the "Apply to Blog" button...

That's it! You've now successfully centered your blog banner. If you decide to change the dimensions of your blog layout in the future, you can simply return to this area and increase or decease that last number to recenter you banner image.
Enjoy~
To use this tutorial you will need to have a banner already loaded onto your blog. If you need help installing a blog banner then follow this tutorial: How to: Install a Blog Header.
With a banner in place you are ready to move forward with "pushing" your blog header, so let's begin...
1. Log-in to your blog click on the "Design" link in the top right corner link list...

2. This should bring you directly to the "Template" page, in the left links list...

3. Click on the "Customize" button...

4. We are now in the "Template Designer" area...

5. Click on "Advanced" at the bottom of the left link list...

6. Now using the scroll bar...


8. Click on that link to be taken to the CSS area...

If you've previously inserted any CSS code then you will see it present in this area. If you have not then this area will be empty on your blog.
9. Now copy the code from the scrolling box below...
10. And paste it into the CSS area...

and you should see your banner image immediately shift to the right.
11. If you wish to move it over further to the right or left you can easily do this by either increasing or decreasing the last number in the code. So, if the setting is at "0", then your banner will be all the way to the farthest left position it can go...


That's it! You've now successfully centered your blog banner. If you decide to change the dimensions of your blog layout in the future, you can simply return to this area and increase or decease that last number to recenter you banner image.
Enjoy~
Subscribe to:
Posts (Atom)