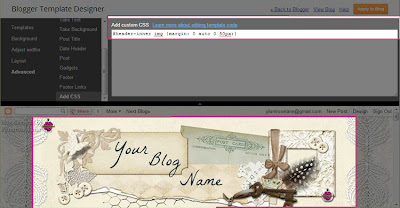
To use this tutorial you will need to have a banner already loaded onto your blog. If you need help installing a blog banner then follow this tutorial: How to: Install a Blog Header.
With a banner in place you are ready to move forward with "pushing" your blog header, so let's begin...
1. Log-in to your blog click on the "Design" link in the top right corner link list...
2. This should bring you directly to the "Template" page, in the left links list...
3. Click on the "Customize" button...
4. We are now in the "Template Designer" area...
5. Click on "Advanced" at the bottom of the left link list...
6. Now using the scroll bar...
8. Click on that link to be taken to the CSS area...
If you've previously inserted any CSS code then you will see it present in this area. If you have not then this area will be empty on your blog.
9. Now copy the code from the scrolling box below...
10. And paste it into the CSS area...
and you should see your banner image immediately shift to the right.
11. If you wish to move it over further to the right or left you can easily do this by either increasing or decreasing the last number in the code. So, if the setting is at "0", then your banner will be all the way to the farthest left position it can go...
That's it! You've now successfully centered your blog banner. If you decide to change the dimensions of your blog layout in the future, you can simply return to this area and increase or decease that last number to recenter you banner image.
Enjoy~


Fantastic worked a treat and so easy to follow! Thank you!
ReplyDeleteSuper! Thanks for letting me know Niky~♥
DeleteThanks for sharing what you have learned about moving the header over to the right!
ReplyDeletethanks for this info it helped a lot my magic center number 88. I have to ask where did you learn all about blog codes? how do you design your blog templates? beautiful. is it hard to learn all of this? sorry more than one question.
ReplyDeleteHi Esveyde,
DeleteI was a web developer for many years so I learned Html & CSS code through that work. I'm also an art major and have studied Photoshop Creative Suite in college.
Best~
♥Sharon
Hi,
ReplyDeleteYour instructions were the 3rd one that I tried to center a banner header on Blogger and I am so pleased with the results! It centered at 130px. Thank you very much for helping. Check the banner out here...
http://broussardgregorysledgewilliams.blogspot.co.uk
Glad they helped Tara~!
Delete♥Sharon
Nope didn't work for me. I did everything twice. Even got someone else to follow the instructions and that sucker just refuses to budge from the left. So frustrating but thanks anyway
ReplyDeleteOh that's a shame Kereru ~ I do think it matters what template is being used and heaven knows there are so many variables that can interfere. Sure hope you find something that works for your specific look.
ReplyDelete♥Sharon