Translate

Showing posts with label center. Show all posts

Tuesday

How to: Push (or Center) a Blog Header

This tutorial is to serve as an alternative to my other tutorial titled How to: Center a Blog Header.  Although that method works well in most cases, it can fail to center if used with other enhanced template features so if you find your banner image is not centering properly then go ahead and give this simple method a try.  The code below is not meant to be used in combination with any other code for centering a header so be sure to remove any prior "banner centering code" before moving forward.

To use this tutorial you will need to have a banner already loaded onto your blog.  If you need help installing a blog banner then follow this tutorial: How to: Install a Blog Header.
With a banner in place you are ready to move forward with "pushing" your blog header, so let's begin...

1. Log-in to your blog click on the "Design" link in the top right corner link list...


2. This should bring you directly to the "Template" page, in the left links list...


3. Click on the "Customize" button...


4. We are now in the "Template Designer" area...


This interface offers you the ability to easily change aspects of your blog.  We will be adding some code to the "Advanced CSS" area so let's navigate to that area...

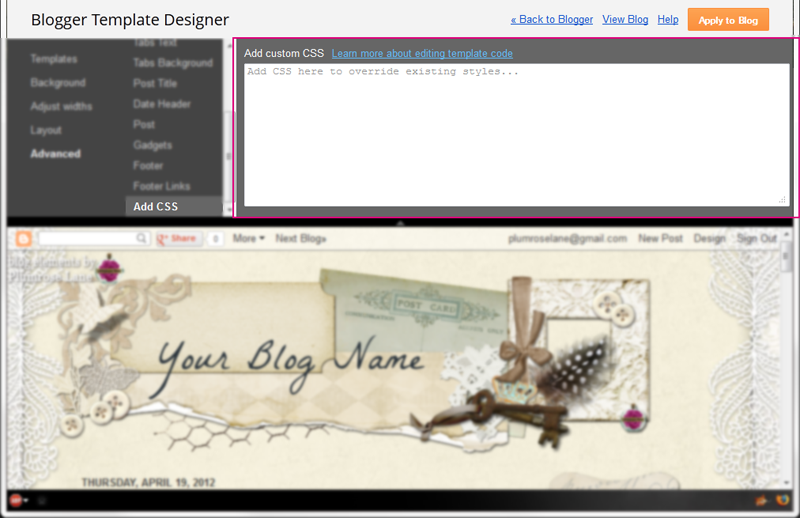
5. Click on "Advanced" at the bottom of the left link list...


6. Now using the scroll bar...


7. Scroll down the inner link list until you see "Add CSS"...


8. Click on that link to be taken to the CSS area...


If you've previously inserted any CSS code then you will see it present in this area. If you have not then this area will be empty on your blog.

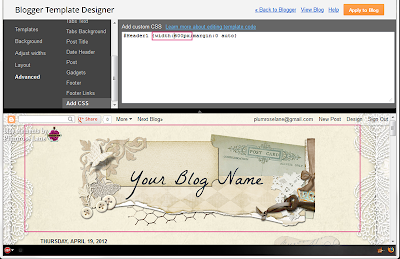
9. Now copy the code from the scrolling box below...


10. And paste it into the CSS area...


and you should see your banner image immediately shift to the right.

11. If you wish to move it over further to the right or left you can easily do this by either increasing or decreasing the last number in the code.  So, if the setting is at "0", then your banner will be all the way to the farthest left position it can go...


12. And if you increase the number to say "100", then you will see your banner image move way over to the right side...


13. Personally, I think somewhere between 30 - 50 works best but test it out and see what looks best on your own blog....


14.  Once you have your banner image set where you want it, then save your changes by clicking the "Apply to Blog" button...


That's it! You've now successfully centered your blog banner.  If you decide to change the dimensions of your blog layout in the future, you can simply return to this area and increase or decease that last number to recenter you banner image.

Enjoy~

Monday

How to: Center a Blog Header

In this tutorial we will walk you through the steps for center a blog header (or banner as it is also called). If you need help installing your blog banner then please view this tutorial first: How to Install a Blog Header  If you need a banner image I offer several free versions which you can find by browsing through my A-Z Theme List.

Below is an example of a blog banner image in place but obviously set off center. The default setting for most Blogger templates is for the banner image to show up toward the left side of your blog as shown below...


So let's begin...
1. Log into your blog and then click the "Design" link found in the top right corner...


2. In the next window click on the "Customize" button...


3. This will open the Blogger Template Designer which you can see an example of shown below...


4. Click on the "Advance" link in the bottom of the left side list...


5. Using the inner scroll bar...


6. Scroll down to the "Add CSS" link...


7. This is the area where you can add a snippet of CSS code to tell your blog to center the header...


8. Now copy the code below and paste it into the rectangle...


9. Now it should look like this...


Within the code you'll notice the number "900" ~ this is the standard size for all of my wide banners.  This size, when used in combination with the "Shrink to Fit" option when uploading a blog is how you can achieve the best fit for your blog.  Playing with both of these settings in different combinations will help you achieve the best look. 

10. To check your blog width, click on the "Adjust widths" link in the far left link list...


11. In case of my sample blog in this tutorial the blog is set to 860 pixels wide...


12.  So I'll jot this number down and return to the "Advanced" area by clicking on that link again...


13. Now, we can change that "900" to "860" as shown in the example below...


14. And preview the changes in the preview area below to see how the changes have taken affect...


15. In the example above it appears the banner has not moved.  This is common and you may need to play around with the number a bit until you begin to see the results you're looking for ~ you can see a few examples of making changes in the screen shots below...

:-----In this example the number is too small so the banner is cut off-----:

:-----In this example the number is too big so the banner is still sitting to the left-----:

:-----In this example the number is just perfect & the banner is centered-----:


16. Now that you have your banner code in place and the image is situated just where you want it, click the "Apply to Blog" button to save your changes...


That's it!  You can now click on the "View Blog" link to view your blog and centered banner.  Remember to use this tutorial in combination with my "How to Install a Blog Header" to find the right adjustments and fit for your own blog.

Enjoy~