Translate

Showing posts with label decorative. Show all posts

Thursday

How to: Add a Decorative Post Divider

The following tutorial will assist you in adding a post divider to your own blog. Post dividers serve as a decorative division between each blog posting.

Post dividers are easily installed through the Template Designer area of your Blogger blog, by inserting a small snippet code into the Add CSS area. 

1. Before you begin you'll need to select a post divider image to use on your blog.  If you've purchased one of my blog themes then you'll already have access to that code.

  a.) Each post divider image has the complete code listed below the image. You will use that code to install the post divider image on your blog.  I suggest copying the code and temporarily pasting it to a text file on your computer ~ if you're using a Windows PC then a "Notepad" document is a good choice for that. This makes the process easier and less confusing.

  b.) In the example below I will be using the Whispers of Spring post divider and here is what that looks like on the page....

410 wide image and code

 
c.) To install a post divider we will use the code found below the image example, rather than the image itself.  I will copy the entire section of code above onto a Notepad document and leave it open for use a little bit later on.  Now let's move on to installing the code onto our blog...

2. Begin by logging onto your blog and navigating to the "Template" area...


3. Next, click on the "Customize" button to the enter the Template Designer area of your blog...


4. At the bottom of the left side menu, click on "Advanced"...


5. Now scroll down the inner menu selections until you see Add CSS and click on that....


6. This will bring you to the CSS area of your blog...


7. If you previously added other CSS changes to your blog then you may see some code appear in this section.  In the example below, I have a snippet of code already inserted to center my banner...


If this is the case on your own blog them be sure to leave that code as is, do not remove it.  We are simply going to add an additional bit of code below, so be sure your mouse is positioned below any pre-existing code.

8. Now, copy the post divider code and paste it into the "Add custom CSS" area ~ again, being sure to paste it below any preexisting code/s...

.post{margin: 0 0 40px 0;
width: 90%;
background: url(http://www.plumroselane.com/image.png);
background-repeat: no-repeat;
background-position: bottom center;
margin:.5em 0 1.5em;
padding-bottom:4.5em;
}

The part shown in red is different for each image so I've made that a generic link in the example above.  You won't have to make any changes to the code, as long as you're using one of my post divider.

9. In my example the code now looks like this...


10. With the code now in place you can now preview how the post divider image will appear. To do this, use the lower scroll bar on the right side to scroll down the sample view of your blog...


13. Continue scrolling down until you see the example post divider appear...


If an example does not appear then double check to be sure you copied and pasted the entire code into that CSS area.  In some cases the post divider may not show up. If this is the case the I suggest backing out of the Template Designer, do not save any changes, and start over again.  Please remember that if you've previously installed a post divider you will have to remove that code before trying to insert a new one.

14. With everything set, simply click the "Apply to Blog" button to save your changes...


Adjusting the space around your post divider: If  you find the post divider image appears to be cramped in under the bottom of your posts then you can change the last number on the bottom line of the code to a higher number.  This adjusts the margin between your posts and the post divider.  Changing the number to a higher number, like 5.5, 6.5 or 7.0 will add more space between your blog posts and the post divider image.

Enjoy!

Monday

How to: Setup a Decorative Blog Background

Here are some step-by-step instructions to help you navigate your way to installing one of my decorative blog backgrounds to your blog. The process is fairly simple and the best part is once done, you can easily change your background whenever you like. 

All of my blog themes are now meant to be used with a modified version of the "Picture Window" template so if you don't have that installed or need help tweaking it you can follow along with this tutorial first: How to: Setup & Adjust the "Picture Window" Template.

Before we begin~
Within each of my designer blog themes and backgrounds are boxes filled with code...

This code is what we use to install a decorative background onto our blogs.  To begin you will need to select a background you want to uses. You can peruse my library of blog themes and backgrounds by visiting this link: http://plumroselane-bckgrnds.blogspot.com/p/backgrounds-themes.html

Once you've selected a background you will need to copy the code and paste it into a temporary location ~ I like using a text document, such as "Notepad" (Windows users) since it's an easy place to temporarily store a snippet of code or text.

What's behind this? This code is used in a sidebar gadget to tell your blog to load a background image and where to draw that image from.  The image itself is stored on a designated location on the internet.  

So let's begin...

Begin by logging into your blog, then click the "Design" link in the top right corner of your blog...


Next click on the "Layout" link in the left side link area...

In this next screen we can see a type of skeletal version of your blog layout with rectangular boxes representing different aspects of your blog...

I find it easier to store my decorative background code at the bottom of my blog so that it's out of the way and I don't get it confused with others,  so let's scroll down to the bottom and click on the "Add a Gadget" link...

  A pop-up window will appear with all the various gadget choices Blogger offers...

We will be using the "Html/Java Script gadget so scroll down to that and select to add it, either by clicking on the title or on the blue + button...

 In the next window we see a large empty rectangle under the title "Content"....

This is where we will paste in the background code we have saved from earlier.  The code may look slightly different that what's show below, depending upon which of my codes you're using, but go ahead and paste the entire code into the box...

Once you have your code in place you can click the "Save" button...

That's it!  You can now check your new blog background by clicking on the "View Blog" button at the top...

 ♫Ta-da!♪

You now possess the knowledge to change your blog background whenever the mood (or season) strikes you ~ Congratulations!

Enjoy~

How to: Install a Decorative Blog Header - updated

The information below will help you understand the "header" feature of your blog, allow you to make modifications to this area, and enable you to upload a decorative banner image to your blog.
{Before you begin: You should have a banner image already saved on your computer. You can download a free one or purchase one through an online boutique or website. Here is a link to a selection I offer through my blog and for sale in my shop.

Be sure to save your banner in an easy to find location so you can locate it in the future. I like to save mine in a folder and title the folder "blog images".}

Begin by logging into your blog, then click "Design" found in the top right corner of your blog or navigate to the "Design" tab.

Then click on the "Edit" button found in the header section.
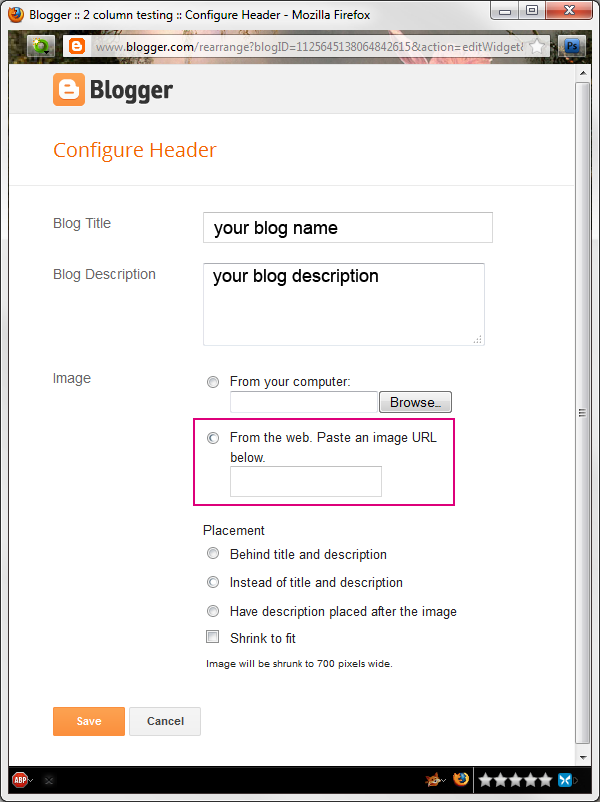
A pop-up window will open showing you a number of options.
So let's go through the list of items you'll see...

In the first and second rectangles you can change the name of your blog and
it’s description…
If you’re using a decorative blog header you won’t need to worry about this area,
unless you want to have the description to up under your blog header.
The next area is where you can upload a banner image from your computer…

In the next area you can select to add your banner from an online location by
inserting a link…
Next is the “Placement” area where you can select to have your description
or blog title show up in combination with using a banner image…
Just below that area is the option to shrink the banner image to fit your blog’s layout…
Just below that, in tiny print, is where you’ll see the size of your current header
based on what template you’re using and how it’s set up…
And finally at the very bottom are the “Save” and “Cancel” buttons…
Now that you understand all of the features and options for the Header area,
Let’s install a custom blog header image and make a few selections to be sure it
looks it’s best.
You’ll need to begin by selecting the “Shrink to Fit” option since this is only
available before you upload your banner image, so click on the square to
select this option…
It’s important to select to shrink your banner so that the image shows up completely
and is not cut off ~ even if the banner image is the exact size the width of your header
it doesn’t hurt to shrink the image as it will simply show up in it’s full size.
Next, we’ll upload the banner image so click on the “Browse” button...
Now navigate to where you have your image saved, click on the image name, and
then click the “Open” button…
You can now select whether you would like a description of your blog to show up
under the image or if you would just like the image to appear with nothing else….
Once you’ve made your selection click the “Save” button to save your image…
Congratulations! Your new header is now in place and you have a working knowledge
of this area you can change your banner image out whenever you like.

Enjoy!