Translate

Showing posts with label installation. Show all posts

Friday

Working With Google Chrome

This posting will cover some important information and add-ons for using Google Chrome. Chrome is a recent addition to the selection of online browsers which has quickly gained momentum among it's competition; Internet Explorer and Mozilla Firefox.  While Chrome boast noticeable faster web browsing and page loading it should be noted that there are some important add-ons to install before using Chrome on a regular basis.  I discuss these additional add-ons and extensions below...

To install Chrome on your home PC visit this link: https://www.google.com/intl/en/chrome/browser/

Installation is simple, just follow the screen prompts to go through the process.  You can even import your bookmarks from other web browsers and I recommend doing this so you don't have to start over again.  Once installed, you can visit the same link above to find more information and tips on how to use your new browser...


With Chrome installed on your computer we'll move on to discussing how to install add-ons and extensions, necessary for safe web browsing. So let's begin...

Finding Add-ons
To find add-ons for Chrome you'll need to access the "Chrome Webstore". You can do this in one of two ways, either by opening a new tab and clicking on the "Webstore" icon...

Or by clicking on the "Customize and control" icon...


and in the drop-down menu, clicking on "Settings" ...


Then clicking on "Extensions" in the left side list...


In this area you can see all of the extensions, currently installed on the browser, and find new extensions by clicking on the "Get more extensions" link at the bottom of the page... 


Once in the Extensions area of the Webstore, you can easily use the Search feature to find the extensions you're looking for by title or browse their extensive library of add-ons...


Installing Extensions
To install an extension on Chrome, begin by searching for the item you want by typing the title in the search box...


A list of results will show up from your search...


To choose and install the extension click on the "Add to Chrome" button next to the extension you want to install...


Recommended Extensions

WOT
WOT stands for Web of Trust and is a tool I've used for year now.  Using small color coded donut shaped icons, WOT easily shows you which sites are safe and which ones you want to avoid...


You can even participate in WOT by grading websites yourself. They base their ratings on 4 categories including...


Once installed, WOT is integrated into most commonly used platforms like Facebook and Twitter so that even bad links posted by innocent users can be easily avoided.

To install WOT, simply visit the "Extensions" section of the "Webstore" as described in previous steps and search for the title in the "Search" bar. A listing of options will appear... 


To find out more about WOT and to participate in their ratings program visit: www.mywot.com

Adblock Plus
Adblock Plus is another invaluable tool I've used for years.  While most visitors to commonly used website like Facebook are greeted by a barrage of online advertising, my sidebar areas areaclear as a noon sky and yours can be too...


To install Ad Blocker, simply visit the "Extensions" section of the "Webstore" as described in previous steps and search for the title in the "Search" bar. A listing of options will appear... 


While there are many ad blocking programs available, I recommend "Adblocker Plus" ~ I've used it for years and have found it to be a reliable and stable add-on.

DoNotTrackMe
One final tool I recommend is the DoNotTrackMe. Tracking was one of my greatest concerns in switching over to Google Chrome. It's commonly known that everything we do these days is tracked by many corporations but rogue sites can use this tool to gain personal information about you such as log-in and financial information.  For this reason I use DoNotTrackMe.  

To install this add-on simply type the title exactly as it appears above, into the search bar on the Extensions page, then click on the "Add to Chrome" button....


After installing this program you may want to make some tweaks to ensure you're able to view the websites you visit and use most often.  Case in point ~ I noticed the top navigation bar went missing on Blogger after installing the DoNotTrackMe add-on.  Through researching the issue I found it was necessary to change the settings for some Google sites so that they were not being blocked.
To access the settings for individual websites just click on the small icon for this program, highlighted in the screen shot below...


This opens a window where you can adjust the settings per site and even access an all inclusive list, by clicking on gear icon in the top right side, to turn the feature on and off for individual sites...


That's it!  I hope you've found this information helpful.  It's always important to get to know our browsers to help keep our information and our computers safe.  Beyond the important stuff there's a whole world of goodies to search through and explore including beautiful themes, helpful tools, and games.  So have fun!

Enjoy~

Monday

How to: Setup a Decorative Blog Background

Here are some step-by-step instructions to help you navigate your way to installing one of my decorative blog backgrounds to your blog. The process is fairly simple and the best part is once done, you can easily change your background whenever you like. 

All of my blog themes are now meant to be used with a modified version of the "Picture Window" template so if you don't have that installed or need help tweaking it you can follow along with this tutorial first: How to: Setup & Adjust the "Picture Window" Template.

Before we begin~
Within each of my designer blog themes and backgrounds are boxes filled with code...

This code is what we use to install a decorative background onto our blogs.  To begin you will need to select a background you want to uses. You can peruse my library of blog themes and backgrounds by visiting this link: http://plumroselane-bckgrnds.blogspot.com/p/backgrounds-themes.html

Once you've selected a background you will need to copy the code and paste it into a temporary location ~ I like using a text document, such as "Notepad" (Windows users) since it's an easy place to temporarily store a snippet of code or text.

What's behind this? This code is used in a sidebar gadget to tell your blog to load a background image and where to draw that image from.  The image itself is stored on a designated location on the internet.  

So let's begin...

Begin by logging into your blog, then click the "Design" link in the top right corner of your blog...


Next click on the "Layout" link in the left side link area...

In this next screen we can see a type of skeletal version of your blog layout with rectangular boxes representing different aspects of your blog...

I find it easier to store my decorative background code at the bottom of my blog so that it's out of the way and I don't get it confused with others,  so let's scroll down to the bottom and click on the "Add a Gadget" link...

  A pop-up window will appear with all the various gadget choices Blogger offers...

We will be using the "Html/Java Script gadget so scroll down to that and select to add it, either by clicking on the title or on the blue + button...

 In the next window we see a large empty rectangle under the title "Content"....

This is where we will paste in the background code we have saved from earlier.  The code may look slightly different that what's show below, depending upon which of my codes you're using, but go ahead and paste the entire code into the box...

Once you have your code in place you can click the "Save" button...

That's it!  You can now check your new blog background by clicking on the "View Blog" button at the top...

 ♫Ta-da!♪

You now possess the knowledge to change your blog background whenever the mood (or season) strikes you ~ Congratulations!

Enjoy~

Tuesday

How to: Install a Blog Header (Banner Image)

The information below will help you understand the "header" feature of your blog, allow you to make modifications to this area, and enable you to upload a decorative banner image to your blog.

{Before you begin: You should have a banner image already saved on your computer. You can download a free one or purchase one through an online boutique or website. Here is a link to my own designer themes where you'll find a selection of free and low cost banners.

Be sure to save your banner in an easy to find location so you can locate it in the future. I like to save mine in a folder and title the folder "blog images".}

1. Begin by logging into your blog, then click "Design" link found in the top right corner of your blog...


  2. Next click on the "Layout" link in the left side link area...


3. In the next view look for the area with your blog title immediately followed by "(Header)", then click on the blue "Edit" link within this frame...


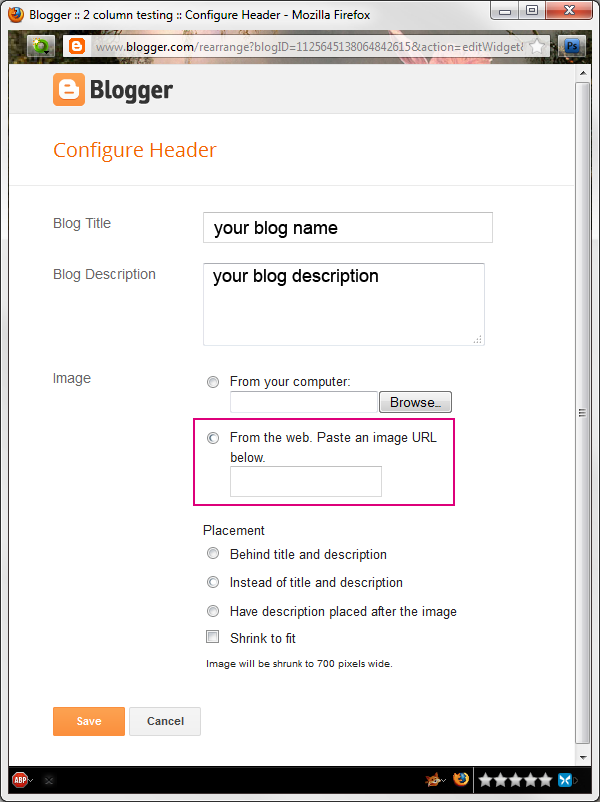
4. A pop-up window will appear.  Let's go through the list of items you'll see so can get to know this area of your blog...


4. a. In the first and second rectangles you can change the name of your blog and it’s description…


If you’re using a decorative blog header you won’t need to worry about including anything in this area since the information will be included on your banner image, unless you would like a description of your blog to appear directly under your blog header.

4. b. The next area is where you can upload a banner image from your computer…


4. c. Below that is where you can add your banner from an online location by inserting a link…


4. d. Next is the “Placement” area where you can select to have your description or blog title show up in combination with using a banner image…


4. e. Just below that area is the option to shrink the banner image to fit your blog’s layout…


This is helpful if you're planning on using a larger image and don't have the ability to resize the image by using a computer program.

4. f. Just below that, in tiny print, is where you’ll see the size of your current header area based on what template you’re using and how you have that set up…


4. g. And finally at the very bottom are the “Save” and “Cancel” buttons…


Now that you understand all of the features and options for the Header area, let’s install a custom blog header image and make a few selections to be sure it looks it’s best.

5.  We'll begin by choosing whether to click the "Shrink to Fit" option. This choice is only available before you upload your image but if you find you need to change the option you can simply remove the image and reload it again.  So for this example we're going to click on the square to select this option…


6. Next, we’ll upload the banner image ~ to do this click on the “Browse” button...


7. Now navigate to where you have your banner image saved, click on the image and
then click the “Open” button…


8. Your banner image will appear in the window and you can now click "Save"...


9. You have now successfully installed a custom blog banner to your blog. To view your new banner simply click the "View blog" button at the top of the page...


Congratulations!  If you find that your header looks off center or misplaced then please refer to my How to Center a Blog Header tutorial.

Enjoy~