
While this tutorial does not cover how to install a Designer background it’s a good idea to consider what background you will want to use. You can peruse my selection of free backgrounds through the Themes & Backgrounds area of my blog. Here's the direct link for that: http://plumroselane-bckgrnds.blogspot.com/p/backgroundsthemes.html
Install a background is covered under a different tutorial so once you've completed this tutorial and have the template set up you can move on to: How to: Install a Decorative Blog Background and here's the direct link for that: http://plumroselane-tutorials.blogspot.com/2012/09/how-to-set-up-decorative-blog-background.html
I can tell you that out of all of my tutorials this is the longest and perhaps the most time consuming but the rewards are huge. You will only have to complete this process one time and once completed you'll have the pleasure of easily changing out your background whenever the mood strikes you. Changing out background images is as simple and copying and pasting a bit of code. So take your time, get through this and you'll enjoy the rewards of making your blog truly yours.
If you find you would rather not hassle with all of these changes, then I do offer this service and you may contact me for more info on pricing.

Now on with setting up the template…
Selecting the Picture Window Template
1. We'll begin by installing the Picture Window template so let's access your blog by clicking the "Design" link...

2. Click the orange “Customize” button to access the Template Designer area...

3. We'll start by selecting the template ~ to do this simply click on the little image of the Picture Window template, there’s no need to click on any of the other options below that...

With that selected we are now going to make some modifications to the default template settings.
Modifying the Template in the Template Designer
These changes will remove some of the presets that would otherwise interfere with the beauty of designer themes and backgrounds, so let's move on..
4. Click on the “Background” link, second choice from the top in the left side link list...

5. In this view you're going to remove the default background image ~ to do this, simply click the link "Remove image" show under the little image...

6. A pop-up window will appear, click "Ok"...

7. Your view should now look like this with a blank spot were the image was...

In this area you can also select a color scheme to match your future blog background. You can make a selection now or come back at any time to choose a new scheme or change your selection. You will also have the option of hand selecting your own color choices outside of the ones show here in other areas of the Template Designer.
Backgrounds, Layouts and Sizing
While we're in this area of the Template Designer, let's discuss sizing and layouts since these are also important aspects to consider when choosing a blog background. All of my backgrounds come in three sizes and you have a lot of options for how you want to use those sizes. The sizes that are listed for my backgrounds are 800, 940, and 1050 pixels wide. When we mention these sizes we are referring to the center area of your blog which includes the posting area as well as any sidebar areas you have set up.

The overall width of these areas are controlled in the "Adjusts widths" area of the Template Designer and here is a view of that page...

The layout of your blog which includes the amount of sidebar areas you have and where they sit next to your posting area are controlled in the "Layout" area and here is a view of that page...

If this is your first time setting up one of the new templates then you’ll probably want to make some additional adjustments in the “Adjust widths” and “Layout” areas. Some standard width adjustments are:
3 Column Blog
Sidebar 200px each
or 450px if both sidebars are on one side
You may need to play around with these settings a bit until you find a combination you like and I recommend coming back later once you’re finished with this tutorial.
Final Template Designer Modifications
8. Moving onto our final adjustments, let's click on “Advanced” at the bottom of the list...


10. Now click on “Backgrounds” to adjust some of the presets...


10 - b. and a pop-up window will appear...

10 - c. Click on the checkered square next to the word “Transparent”...

10 - d. Then click outside of the box to keep the selection and close the pop-up window. I usually just click on the gray area to the right of the color choices...

10 - e. Now moving along in the same manner, we're going to change the "Post Background" color to transparent as well, until the final outcome looks like this...

11. Next, using the scroll bar, scroll down and click on “Post”...

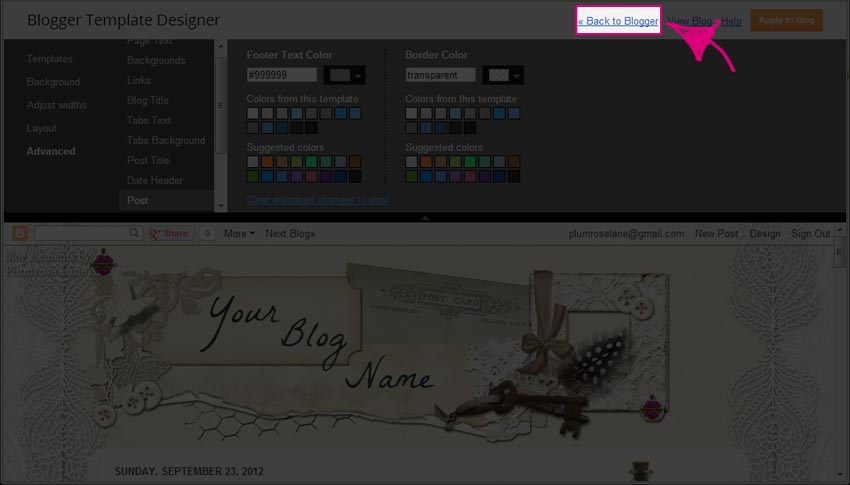
11 - a. In this section, click on the small arrow to change the “Border Color” to transparent as you did in the steps above...

Be sure to only change the Border Color and don't touch the "Footer Text Color" ~ since you wouldn't want your footer text to disappear or be invisible.
12. Now click the "Apply to Blog" button to save all of the changes you've made...

13. You have now completed the changes in the Template Designer area. If you were to take a look at your blog, the only presets still remaining area an outlined white center area and a gray bottom or "footer" area. We can now move on to making the final modifications in the Html area of your blog. To continue on to that area, click the "Back to Blogger" link at the top...
Before we begin working in the in the Html area of your blog, it's important to make a backup copy of your blog. Working in Html can be tricky and one small mistake or mistype can wreak havoc. Since working with Html is like speaking another language (it can look like gibberish if we don't it), remembering what changes we made can be nearly impossible so it's always recommended that you make a backup of your blog's template. This will ensure that if something does go wrong you can revert back and start over.
So, let's save a backup copy of your blog's template…
14. On the “Template” page click on the gray “Backup/Restore” button toward the top right corner.

15. Click the orange “Download full template” button to save a copy to your computer...


With that done we can now safely move on to making changes in your Html code section.
So let’s begin with our final adjustments…
Adjustments to Html Code
16. In the “Template” area of your blog, click the “Edit HTML” button...

17. This is a view of the Html area of your blog...

18. To make changes in this area we'll first need to click the "Format Template" button to expand the code view. Then we will need to use the built-in "Search" feature to find existing code and replace it with modified snippets of code. To initiate the "Search" feature click anywhere within the coded area with your mouse, then click and hold down the "Ctrl" key on your keypad, then click the "F" key - "F" is for "Find". This will open up the "Search" bar...

19. With that initiated we're going to first remove the automatic white center background that’s preset in the template. So either type the words below, or copy and paste them, into the search area …
main.background
so it looks like so...

Now click the "Enter" key on your keypad to find that entry in the code.
21. You'll see the code immediately change with that snippet of code highlighted...

22. Here is a view of the section of code you will be replacing...
23. Now copy the code below and paste it over the entire code shown above ~ be sure to cover the beginning arrow just before the first "Variable" and the ending arrow that follows the second "20px"...
24. It's important to preview your changes to be sure there are no errors so to do this, click the "Preview template" button at the top...

25. A preview of your blog will now appear where the Html code was visible and you can use the scroll bar to scroll down and double check to be sure your changes have taken and the white center area no longer appears...

26. With the correct changes made you can now click the "Edit template" button to revert back to the Html view...

27. And click the "Save template" to save your changes...

With that you've just completed the first of three steps. Only two more to go and you're done, so let's move on on...
28. Now we’re going to remove the gray shadow outline from the center post area. Let's first reset the search so we can find the correct snippet of code. To do this, use the scroll bar to scroll back up to the top of the code area...

and then click inside the Html code area to reset the search area to the top of the page.
29. Now to find the next snippet of code, either type the words below, or copy and paste them, into the search area …
so it looks like so...

30. You'll see the code immediately change with that snippet of code highlighted...

31. Here is a view of the section of code you will be replacing...
32. Now copy the code below and paste it over the entire code shown above ~ be sure to cover the beginning arrow just before the first "Variable" and the ending arrow that follows the second "1px"...
Note: From time to time I've found that using the Search feature for this step doesn't find the correct section of code the first time. If you experience this too and the code does not look exactly like the example shown above, then simply scroll back to the top of the Html code area and click anywhere within the code ~ this will reset the Search function back to the top of the Html code and you can search again for this section of code.
33. Once again we'll preview the changes to be sure they took affect so click on the "Preview template" button...
34. Scroll down to double check that the shadow has been removed from the outside edge of your blog posts (this may be a little tough to see if you already have a blog background installed)...
35. With the correct changes made you can now click the "Edit template" button to revert back to the Html view...
36. And click the "Save template" to save your changes...
With that we can now move on to making the final change to the Html code.
37. In this final modification we will remove the dark gray footer background. Once again let's reset the search back to the top by using the scroll bar and scrolling to the top of the code area...
then click inside the Html code area at the top of the page.
38. Now to find the next snippet of code, either type the words below, or copy and paste them, into the search area …
so it looks like so...

39. You'll see the code immediately change with that snippet of code highlighted...

40. Here is a view of the section of code you will be replacing...
41. Now copy the code below and paste it over the entire code pictured above ~ be sure to cover the beginning arrow that precedes "Variable"and the ending arrow that follows "left"...
43. Scroll down to double check that the gray color has been removed from the footer area of your blog...
44. With the correct changes made you can now click the "Edit template" button to revert back to the Html view...
45. And click the "Save template" to save your changes...
That’s it! Your blog template is now set up and ready for you to install a Designer Template or Background.
If you find that any of the changes did not take affect then you can restore your previous template and start over with the Html changes. Only the Html changes will need to be redone. If you received an error message for any of the changes above then simply back out of the Html section without saving your changes and return again to start over.
I hope you enjoy the modified version of the Picture Window template and all the options it offers for decorating your blog!
Update:
Due to recent changes in the Html section of Blogger blogs we are no longer able to offer support for this tutorial. Although the tutorial has been tested and is used regularly by our designers, the steps are often too complex for the novice blogger to successfully complete. If you are having difficulties, such as receiving Html error messages, then we recommend the following steps:
1. If English is not your primary language then it is recommended you seek out a tutorial in your own language. Working with Html code is too complex to use in a foreign language and using a translator will not deliver accurate results.
2. If you are receiving Html code errors then we recommend searching Google for an alternative tutorial as there are several others available in cyberspace.
We do offer template setup and modifications along with installation of our designer blog themes. If you area interested in this service please contact us directly.
Best~