Translate

Showing posts with label post. Show all posts

Tuesday

How to: Create a Blog

This tutorial will walk you through the steps of starting your own blog.  Blogging is a fantastic outlet for people of all interests ~ from politics to crafting, there are massive genres existing in the world of blogging. There are also several popular platforms and the most common are Blogger, Wordpress, Tumbler, and Typepad.  I began like most on Blogger because it was a free and easy to use interface.  While times have changed a bit since those early days, Blogger still stands as an excellent platform for bloggers.

To begin blogging you'll first need to select a title and link for you blog.  While bloggers do try to keep the title and link of their blogs the same, it isn't entirely necessary, so if you find that the name you want to use is taken then consider using your own name or a modification of that for your link, such as www.sharonwrites.blogspot.com.  Now that you've given the title some thought, let's begin.

The tutorial below is a combination of my own tutorial and one published on wikiHow. I'd like to thank the contributors for their additional images and content. source link:  http://www.wikihow.com/Start-a-Blog-on-Blogger

1. Begin by visiting www.blogger.com/home, where you will be prompted to log-in to your Google account. All Blogger blogs are associated with a Google account.  If you don't have one then you will need to create a new account...


2. On the next page you will need to confirm your profile information and click "Continue to Blogger"... 


3. On the next page you will fill in your Blogger display name and click "Continue to Blogger"...


4. Once logged in you will be redirected to the Blogger home page...
This page will show a list of your blogs and a list of the blogs you follow, if any.

5. To create your first blog click the gray "New Blog" button...

6. On this page you'll select a blog "Title", "Address", and a template.

You can use anything you like for the title, since this can be changed at any time.

For the address you'll need to play around, since Blogger has been around for a long time you may find the title you want is not available. You can use a combination of your actual name and what you do ~ I used sharons-artblog.blogspot.com, and it doesn't have to match your blog title. Try some different combinations until you find one that works. You'll see a blue check when you've found an address that's available...


7. Next you'll choose a starter template, which will act as the basic design/layout of your blog. I recommend using the "Picture Window" because it's easily modified for my free blog elements and designer blog themes...

8. Click "Create blog"...

9. Now you’ll be taken back to the Blogger home page where you’ll see your new blog appear at the top of the page.  Click on the title of your new blog to access the back end…


10. On the next screen you'll see an overview of the control area where you can personalize your blog and set up basic options...

11. Using the "Template" link, gives you access to change the template and other visible features of your blog. You can control the layout, width, text, colors, and so much more...

12. Click on the "Customize" button to enter the "Template Designer" area and play with these settings...

13. The "Settings" area allows you to control the functionality of your blog such as who is able to view your blog, contribute to it, and comment on your blog. Click this link to explore this area further...

14.  You can adjust publishing, comments, archiving, permissions, and all the other settings for your blog within the sub areas of the "Settings" tab.

15. To write your first blog post click the orange "New post" button found on at the top of the sidebar area...

16. Always begin by titling your blog posts ~ this is a key feature to enabling search features, archiving, and visitors to easy find and sort your blog posts... 

17. Next click in the large box space, this is where you will write your blog posts content. You can add text, pictures, videos, etc. Hover over each icon to view a pop-up key word of what each function is...

 18. You can even use Html to write your blog posts if you know this web developing language...

19. On the right sidebar are more key features, such at "Labels"; single words that describe your posts and "Options" which allow comments and other interactivity for your individual posts...
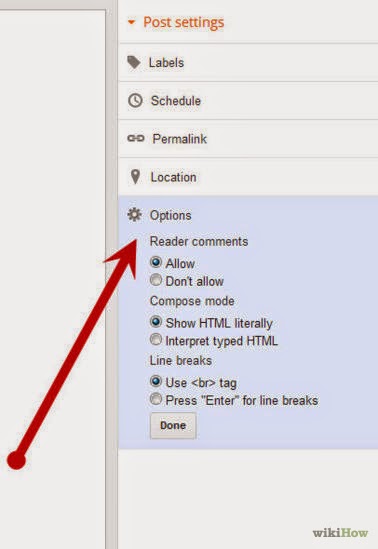
20. Once you've finished writing your blog post, click the "Publish" button and your blog post will be live on your blog...

That's it! Congratulations on setting up your new blog!  You can find more helpful tutorials on customizing your blog by visiting the Tutorials section of my blog.  I also offer a more in-depth video tutorial on writing a blog post at this link: How to: Write Your First Blog Post

Enjoy~

Thursday

How to: Add a Decorative Post Divider

The following tutorial will assist you in adding a post divider to your own blog. Post dividers serve as a decorative division between each blog posting.

Post dividers are easily installed through the Template Designer area of your Blogger blog, by inserting a small snippet code into the Add CSS area. 

1. Before you begin you'll need to select a post divider image to use on your blog.  If you've purchased one of my blog themes then you'll already have access to that code.

  a.) Each post divider image has the complete code listed below the image. You will use that code to install the post divider image on your blog.  I suggest copying the code and temporarily pasting it to a text file on your computer ~ if you're using a Windows PC then a "Notepad" document is a good choice for that. This makes the process easier and less confusing.

  b.) In the example below I will be using the Whispers of Spring post divider and here is what that looks like on the page....

410 wide image and code

 
c.) To install a post divider we will use the code found below the image example, rather than the image itself.  I will copy the entire section of code above onto a Notepad document and leave it open for use a little bit later on.  Now let's move on to installing the code onto our blog...

2. Begin by logging onto your blog and navigating to the "Template" area...


3. Next, click on the "Customize" button to the enter the Template Designer area of your blog...


4. At the bottom of the left side menu, click on "Advanced"...


5. Now scroll down the inner menu selections until you see Add CSS and click on that....


6. This will bring you to the CSS area of your blog...


7. If you previously added other CSS changes to your blog then you may see some code appear in this section.  In the example below, I have a snippet of code already inserted to center my banner...


If this is the case on your own blog them be sure to leave that code as is, do not remove it.  We are simply going to add an additional bit of code below, so be sure your mouse is positioned below any pre-existing code.

8. Now, copy the post divider code and paste it into the "Add custom CSS" area ~ again, being sure to paste it below any preexisting code/s...

.post{margin: 0 0 40px 0;
width: 90%;
background: url(http://www.plumroselane.com/image.png);
background-repeat: no-repeat;
background-position: bottom center;
margin:.5em 0 1.5em;
padding-bottom:4.5em;
}

The part shown in red is different for each image so I've made that a generic link in the example above.  You won't have to make any changes to the code, as long as you're using one of my post divider.

9. In my example the code now looks like this...


10. With the code now in place you can now preview how the post divider image will appear. To do this, use the lower scroll bar on the right side to scroll down the sample view of your blog...


13. Continue scrolling down until you see the example post divider appear...


If an example does not appear then double check to be sure you copied and pasted the entire code into that CSS area.  In some cases the post divider may not show up. If this is the case the I suggest backing out of the Template Designer, do not save any changes, and start over again.  Please remember that if you've previously installed a post divider you will have to remove that code before trying to insert a new one.

14. With everything set, simply click the "Apply to Blog" button to save your changes...


Adjusting the space around your post divider: If  you find the post divider image appears to be cramped in under the bottom of your posts then you can change the last number on the bottom line of the code to a higher number.  This adjusts the margin between your posts and the post divider.  Changing the number to a higher number, like 5.5, 6.5 or 7.0 will add more space between your blog posts and the post divider image.

Enjoy!

Sunday

How to Write a Blogger Blog Post ~ video

In this post we'll learn how to write a basic blog post in Blogger.  I'm trying a new tool out for this by creating a video tutorial which I've inserted below.  This is my first (ever) video tutorial so please bear with my nervousness until I get comfortable with this new medium.  I will still be creating my written tutorials but they take much longer to create, approximately 4 - 6 hours each, so I will publish them as time permits. In the meantime I hope you find these helpful in trying to navigate Blogger's new interface.

If you would like to view the video in full screen simply click on the video to be taken directly to my YouTube channel.


Enjoy~

How to Add a Post Signature

If you're looking to add a decorative signature to your blog posts this tutorial is for you. Basically we'll be installing a snippet of code so that a signature image will automatically show up each time you write a new blog post.  This saves you the step of manually inserting a signature image with each posting.

Before we begin: You will need a signature image - preferably a PNG with a clear background so that any color background show through. You can either create an image using a graphics program like Gimp or Photoshop or you can purchase a signature image from a designer like those I offer in my Etsy shop.

If you make your own you will need to host the image with an online image storage company like Photobucket which will supply you with a direct link to the image. This link will be used in combination with some Html code so that your signature shows up with each blog post.  Note that when you purchase a signature from a designer, most will host the image for you and supply you with the completed code.

Now that you have a link to your signature image, let's begin...

1. Begin by logging into your blog, then click "Design" link found in the top right corner of your blog...


2. Next click on the "Settings" link in the left side link area...


3. Now click on the "Posts and comments" link...


4. Within this section, locate the second option down "Post Template" and click on the "Add" link...


A rectangular area will appear, this is where you'll insert the Html code for your image signature.

5. Copy the code below and paste it into the box...

6. The box should now look like this...

7. Then replace the words "SIGNATURE URL" with the address of where your own signature image is stored. I'll insert mine in the example below...

 8. With you own link now inserted into the code, you can now save your changes by clicking the "Save settings" button...


9. Your signature image will now appear the next time you go to write a new blog post. To confirm that your signature image is correctly installed you can click the "New Post" button to open the new post screen...


10. There your signature image should appear just as mine can be seen below...


11. If instead you see a broken image symbol...


then the link to your image may not be installed properly.  You'll need to return to the "Posts and comments" area and double check each character to be sure the link is correct and none of the code was accidentally left out.

Because the signature image was installed today, it will not appear in any previously written blog posts.  If you would like to manually add an image signature to a specific blog post then follow the steps below.  If you're happy with the results so far then, Congratulations!

Special Note: At the time I am writing this, Blogger is currently experiencing a technical difficulty with displaying post signatures and preset signatures are showing up as a broken link. If you are experiencing this issue then for the moment you will need to manually install your image signature in individual blog posts which is covered below.

Manually adding a signature image~
To manually add an image signature to a blog posts follow the steps below.

1. Picking up directly from where we left off, click on the "View blog" link at the top of the page...


2. Click you mouse within the box area and then click on the "Insert image" symbol...

 3. A pop-up window will appear, click on the "Choose files" button...

4. Navigate to where you have your signature image saved, click on the image and then click...

5. In the next view click on the "Add selected" button...

6. You should now see your signature image inserted into your post...

7. If you want to change the location of your signature, simply click on the image and an option bar will appear....

8. Select where you would like your signature to appear and you image will move to that location... 

 That's it!  Once you've completed writing your blog post you can click either the "Save" or "Publish" button to continue.

Congratulations!

Enjoy~

Tuesday

How to: Add a Post Divider

The following tutorial will assist you in adding a post divider to your own blog. Post dividers serve as a decorative division between each blog posting. To view a selection of my coordinating post dividers click here.

To use this tutorial you will need to work in the html code area of your blog. For this reason I strongly recommend backing up your blog template before proceeding. To do this Log into your blogger account and navigate to the "Design" area of your blog.

Click on the "edit html" link, then click on "Download Full Template" to save a copy of your current template to your computer. You are now ready to proceed with the tutorial...

In the same html area scroll down through the html code until you find...

.post

this is the area that controls your post layout and style, it will contain items such as....

.post {
margin: 0 0 40px 0;
width: 90%
}

Personally I think it's easier to replace the entire code in that area with the new code so copy the following code and place it over the existing code so that it now reads...

.post{
margin: 0 0 40px 0;
width: 90%;
background: url(http://www.imagehost.com/separator.jpg);
background-repeat: no-repeat;
background-position: bottom center;
margin:.5em 0 1.5em;
padding-bottom:2.5em;
}

Now, all you'll need to do is copy and paste any of the post divider image codes into the red type area inside the parenthesis. In this example I'll use the Stormy Weather post divider so here that code:

Stormy Weather
410 wide image & codehttp://i806.photobucket.com/albums/yy344/plumrose-lane/Blog%20Backgrounds/Blog%20Dividers/PrL-StormyWeather-postdivider-410x.png

and here is how the final code will look for this post divider...

.post{
margin: 0 0 40px 0;
width: 90%;
background: url(http://i806.photobucket.com/albums/yy344/plumrose-lane/
Blog%20Backgrounds/Blog%20Dividers/PrL-StormyWeather-postdivider-410x.
png
);
background-repeat: no-repeat;
background-position: bottom center;
margin:.5em 0 1.5em;
padding-bottom:2.5em;
}

And that's it, click to "Save" and when you return to your blog you should now see a decorative post divider between each blog post.

If you find the post divider appears to be cramped in under the bottom of your post and your tags, try increasing the "padding-bottom: 2.5em" to a higher amount, such as 4.0 or 4.5. This will help to provide more area around the post divider image.

Enjoy!

post signature

Now all of my tutorials in one fabulous package for one low price
$10.95 buys the complete set of my digital tutorials
all 25 tutorials in PDF format ~ including my exclusive three part series

"How to Create Your Own Blog Background"

available only with this purchase.

Click the book above to purchase from my Etsy shop..