Translate

Showing posts with label add. Show all posts

Saturday

How To: Add a Guest Author to Your Blog

This tutorial covers the steps to add a guest author to your blog.  This option comes in handy if you need help with your blog or if you would like to host a guest writer.

1. To begin, log into your blog and navigate to the "Settings" page as show below...


2. In the Permissions area, find the "Add authors" link and click that...


3. A white text area will appear below...


4. In the text field, type in the email address of your guest, being sure to type their address accurately...


5. Once you begin typing an orange button will appear below the text field, click the button to send the invitation to your guest...


6. Your guest will receive an email from Blogger inviting them to join your blog. The email will include a link they will need to click to accept and join.  Once they have accepted you will see their information show up next to yours in the Permissions area....


7. At this stage, they are only an Author... this means they have the ability to write a blog post, and is denoted by the title next to their info...


8. To change their status to Admin and give them access to your entire blog, then click on the button with "Author" and change it to "Admin"...

9. Once you've changed their status from Author to Admin you will need to notify them since Blogger does not send out an email notification for this step.

That's it!

Enjoy~


Tuesday

How to: Install a Blog Badge (or add an Html Sidebar Gadget)

This tutorial will cover the steps for installing a sidebar gadget that using html or java script code.  It's a simple but important process as it allows you to easily install badges, buttons and widgets from all of the internet. Whether it's my own blog badge, a fellow blogger's button, or one of those nifty gadgets, the few steps involved are quite useful in helping us create our own blog space.

To use this tutorial you'll need to have a sidebar item selected that uses Html code.  For example purposes we'll use my own blog badge seen below but you can also find a wide range of free inspirational sidebar buttons from this page: http://www.prl-images.com/blog_buttons.html

Plumrose Lane

To install this badge on your own blog you'll need "grab" the code or "copy" it and "paste" it into an Html/Java Script gadget. If you need help understanding or practicing how to copy and paste with your mouse I recommend following along with this easy video tutorial: http://www.youtube.com/watch?v=mXRT2YH8EDM  The most important thing to remember when copying and pasting html code is that if you loose a snippet of code it may affect how the button appears so be sure to "grab" all of the code.

So let's begin...

1. Begin by logging into your blog, and click "Design"...


2. Now navigate to the "Layout" section of your blog...


In this area you can see a skeletal view of your blog. Looking over the various sections you'll see the navigation bar, "Header" area, "Blog Posts" area, and any sidebars you have setup on your blog.  This is where you can easily install, move around, and remove various gadgets for your blog.  Clicking on "Add a Gadget" enables you to access a wide range of built-in gadgets that Blogger offers it's user.  


So let's go on and access this area...

3. Click on the "Add a Gadget" link in the sidebar area of your blog...


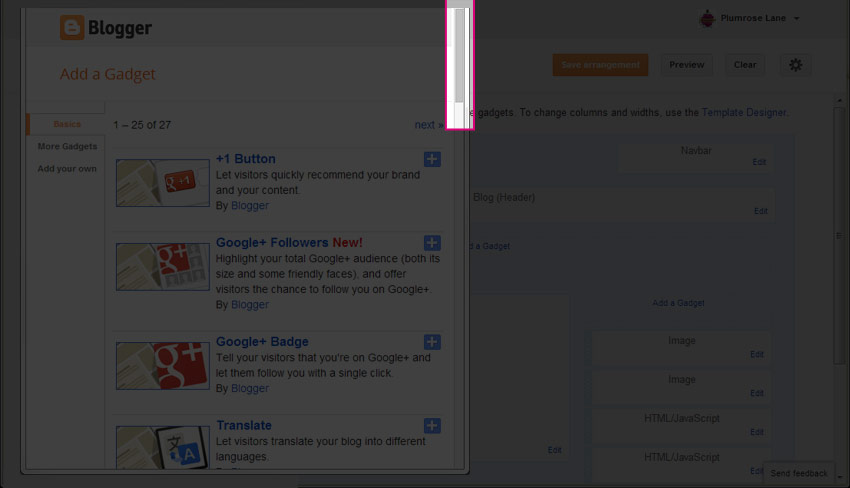
4. You'll see a small window up...


This is where you can access all of the built-in add-ons that Blogger offers.  

5. We're going to be using "HTML/Java Script" gadget so using the scroll bar, scroll down until you see that option...


6. Now click on either the title or the blue + button...


In this area you'll now see where we can title your gadget and paste in any Html or Java Script code.

7. Going back to the code from my own blog badge at the beginning of this tutorial, copy the Html code and paste it into the large rectangle as shown below...


When I'm working with a lot of sidebar gadgets, I find it easier to temporarily title new ones so I can easily move them to their final location so let's do that too while we're here...

8. Type a simple title in, something easy like "new button" works and you can always change this or delete it later...


9. With that completed we can now click "Save"...


10. You will now see your new gadget present on your blog's Layout...


Now let's reposition this new gadget so we can remove that temporary title...

11. By clicking on the gadget with your mouse, you can easily drag the object to a new location within your layout...

12. Choose where you would like to place your new button and then click the "Save arrangement" button...


13. With that done, you can click on the "Edit" link within your new gadget to remove the temporary title...


14. Just be sure to click "Save" to keep your change...


15. Your new gadget will now be titled by it's default gadget title...


16. That's it! Congratulations ~ you've now added an Html/Java Script gadget! You can click the "View blog" button to view your new item...

Enjoy~


Thursday

How to Add a Title to a Blog Header

This tutorial will cover how to add your blog title to one of my free blog banners.  This tutorial is designed to be used only with a free designer blog header and never meant to be used with any copyright protected images.  I offer a selection of free banners located through out my prefab blog themes and they are easily recognizable with the word "free" above them.  To find one of my free blog banners you can peruse the A-Z List of Blog Themes or select from one of the titles below, which are just a sampling of the free banners I offer...

Some of my Free Headers
A Heart for You, Binding Journey, Birthday Bash, Blueberry Plumcicle, Bundle of Joy, Cherish, Day Dream Believer, Fanciful Love, Flight of Fancy, Fore-FatherFreedom, Gilded Love, Je T'aime, Marleque, Once Upon a Pink October, Practical Magic, Providence, Spring Medley, St. Patty's Day, Stardust, Sunshine Garden, Tattered Garden, Tea for Two, and Vintage Easter

While I'm sure there are many free online options for successfully modifying images, for this tutorial we will be using PicMonkey.  I like this site because it has a reputable WOT rating and offers a nice simple to use interface.

Once you've selected a banner and saved it to your computer, you're ready to begin this tutorial. Be sure the banner is saved in an easy to find location ~ for this exercise I recommend placing the image on your desktop so it's super simple to find.  Now let's begin...

1. Open your browser and go to http://www.picmonkey.com...


2. Once there, hover your mouse over the "Edit Picture" area...


3. And you'll see the words change to "Click to open or drag a photo here"...


Since you have your banner located on your desktop you can easily drag and drop the image into the small rectangle area.

5. In one easy step this opens up the banner image in the PicMonkey photo editing area...


6. Now since my copyright only allows for adding text to banner images we're going to go right down to the text area and click on that...


7. Using the scroll bar, scroll through the selection of text choices to find one you like...


8. Once you've made your selection, click on that title, then click on the "Add Text" box at the top of the list...


9. With this, you'll see the Text box window open up, which includes a color chart and other selections, as well as a small box show up in the center of the banner image...


10. We'll begin by adding our text, then move on to modifying it's appearance, so let's begin by clicking inside that small text area in the center of the banner...


11. Click and type your entire blog title in that space...


12.Now before moving on, I recommend increasing the size of the text box close to how large you want your final text to appear.  To do this, hover your mouse over a corner of the white outline and grab one of the corner circles, then drag the corner out as far as you would like your title to go...


13. As you do this you'll notice your text increasing in size, so continue on until you have the size you want...


With that done you can now use the Text box menu to modify other options for your title.

14. To begin using the Text box options, highlight your blog title by scrolling over it with your mouse or click inside the white box where your title appears...


15. Go ahead and play around with these different buttons and settings to get the right affect you want for your blog title...


Here are a few tips...
If you click within the color lines you can change the color of your font.
✻ "B" and "I" stand for Bold and Italic.
✻ Under the "Size", drag the small circle across the bar to easily increase the size of your text.
✻ Clicking on the arrow next to "Normal" shows a selection of other affects.
It's fun to experiment so don't be shy.

16. When you're finished and your title is just as you would like it, go ahead and click the "Save" link at the top...


17. This opens the "Save" area...


18. In this area; you'll want to leave all of the presets as they are, including the artist's original title* and the image type**...


*Since you're using a free image you'll want to leave the title as is out of respect for the originating artist.

**This is especially important when using one of my blog banners as I only use PNG images for my blog banners which ensure a clear background which helps add dimension to my designs and blog themes.

19. Now click the "Save photo" button...


20. And in the pop-up window click the "Save" button...


That's it! You have successfully added text to a free blog banner, congratulations!  Now you can follow this tutorial ~ How to Install a Blog Header to add your new banner to your blog.

Enjoy~

Wednesday

How to: Install Sidebar Tags

In this tutorial we're going to cover how to install and move sidebar tags on your Blogger blog.  The sidebar area is the column or columns to the side of your main posting area.  The process for working with sidebar elements is surprisingly easy and opens up a world of possibilities for customizing your blog.


Before we begin you'll need to have an image or two, set aside to install on your sidebar.  You can find an assortment of free sidebar tags located within each of my designer blog themes by clicking this title: A-Z Blog Theme List  Be sure to have your image ready to use and in an easy to remember location on your computer.

Once your image is ready we can begin~

1. Log into your blog and navigate to the back area by clicking on "Design"...


2. The back area looks like this...


3. Now click on "Layout" in the left link list...


This is the area we'll be working in to add a few sidebar images.  You layout may look different than mine depending up how you have your blog set up. You can easily change your layout at any time by visiting the "Template Designer".

3a. To add an image to your sidebar area we'll be using the "Add a Gadget" link.  You'll see they appear in several locations within the Layout view...


I find it easier to click the link with the area I want to add the gadget, this helps lesson the confusion that come when you have a lot of sidebar gadgets later on

4. So let's begin by clicking on the "Add a Gadget" in the sidebar area...


5. A pop-up window will appear with a selection of choices....


For those of you who are new to this area, this is how we add all sorts of bells and whistles to our blogs, from the "Followers" and "Subscribe" features to "Labels", "Archives" and "Polls", there truly is a plethora of sidebar goodies.  I recommend taking the time to explore this area further and getting to know some of the tools offered here.

6. For now, we'll scroll down to the "Image" gadget, at the time I'm writing this it's the fourteenth selection down...

 
7. To open the gadget you can click on either the title or the plus symbol...


8. You will now see the options appear for adding an "Image" gadget...


9. Let's read over what the different options are for this section ~

Title - this is where we can title the item which helps when organizing or rearranging your sidebar items.  Leaving this area blank can create a nice clean final appearance to your blog.

Caption - the information typed within this area will appear below the image. A good example is if you're holding a giveaway or sale you can insert the end date in this area.

Link - if you would your image linked to a blog post, page or an outside webpage then this is where that information would go.

Image - this section offers two choices; the "From your computer" option is to upload the image from your computer and the "From the web..." offers you the option of inserting a link so the image will show up.  We will be using the first choice for this tutorial.

Shrink to Fit - the last option is a check box for the "Shrink to fit" option.  This enables you to use a larger image and fit it within your sidebar area.  The size it shrinks down to is dependent upon your own sidebar area settings at the time you're adding the image.  I don't usually use this option myself because all of my free sidebar tags are already set to the standard size of 200 pixels wide.

10. Now, to add an image ~ click on the "Browse" button to navigate to where you have your image/s saved...


11. Click on the image you wish to use...


12. Then click "Open"...


13. Once loaded, you'll see the image you selected appear in the window...


14. You can add any other information you choose and once finished click "Save"...


15. Your new image will automatically be inserted at the top of your sidebar area...


...so if you have other images or sidebar elements there, you'll know the top one is new.

16. If for any reason you wish to change the image you can simply click the "Edit" link to open the gadget window again...


17. Once you have your image uploaded you have the option of moving it to a different location.  To do this simply click on the image gadget and drag it to a new location...


18. When you're finished rearranging your sidebar gadgets be sure to click "Save arrangement" to keep your changes...


19. To view your new changes click on the "View blog" button at the top...


That's it!  You can easily add and make changes to this area at any time by returning and using the steps we just followed above.

Enjoy~