
{Before you begin: You should have a banner image already saved on your computer. You can download a free one or purchase one through an online boutique or website. Here is a link to my own designer themes where you'll find a selection of free and low cost banners.
Be sure to save your banner in an easy to find location so you can locate it in the future. I like to save mine in a folder and title the folder "blog images".}
1. Begin by logging into your blog, then click "Design" link found in the top right corner of your blog...

2. Next click on the "Layout" link in the left side link area...

3. In the next view look for the area with your blog title immediately followed by "(Header)", then click on the blue "Edit" link within this frame...

4. A pop-up window will appear. Let's go through the list of items you'll see so can get to know this area of your blog...

4. a. In the first and second rectangles you can change the name of your blog and it’s description…

If you’re using a decorative blog header you won’t need to worry about including anything in this area since the information will be included on your banner image, unless you would like a description of your blog to appear directly under your blog header.
4. b. The next area is where you can upload a banner image from your computer…

4. c. Below that is where you can add your banner from an online location by inserting a link…
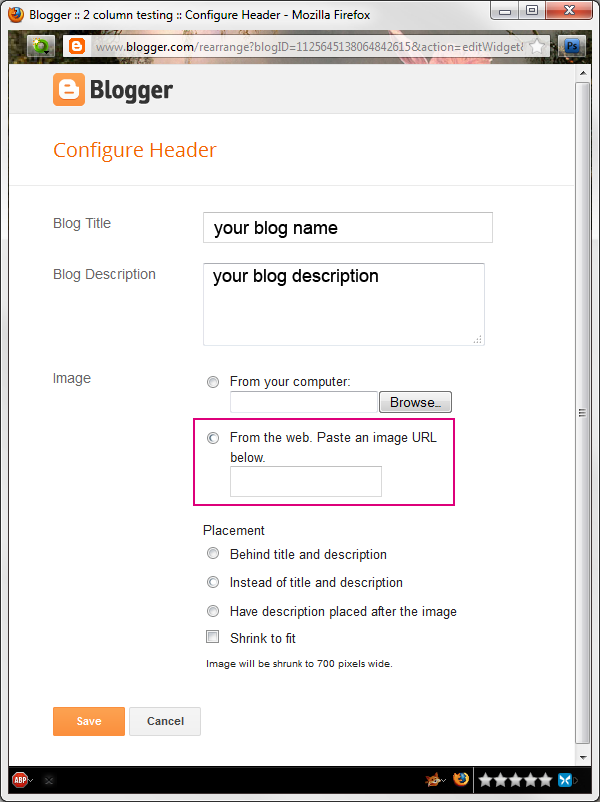
4. d. Next is the “Placement” area where you can select to have your description or blog title show up in combination with using a banner image…

4. e. Just below that area is the option to shrink the banner image to fit your blog’s layout…

This is helpful if you're planning on using a larger image and don't have the ability to resize the image by using a computer program.
4. f. Just below that, in tiny print, is where you’ll see the size of your current header area based on what template you’re using and how you have that set up…

4. g. And finally at the very bottom are the “Save” and “Cancel” buttons…

Now that you understand all of the features and options for the Header area, let’s install a custom blog header image and make a few selections to be sure it looks it’s best.
5. We'll begin by choosing whether to click the "Shrink to Fit" option. This choice is only available before you upload your image but if you find you need to change the option you can simply remove the image and reload it again. So for this example we're going to click on the square to select this option…

6. Next, we’ll upload the banner image ~ to do this click on the “Browse” button...

7. Now navigate to where you have your banner image saved, click on the image and
then click the “Open” button…


9. You have now successfully installed a custom blog banner to your blog. To view your new banner simply click the "View blog" button at the top of the page...

Congratulations! If you find that your header looks off center or misplaced then please refer to my How to Center a Blog Header tutorial.
Enjoy~
Thanks Sharon for the Banner.
ReplyDeleteIts perfect and looks great.
And thanks again for the great instructions. Where would we be without them? (still probably pulling my hair out trying to sort it out! :-) )
Thank you again Sharon - I have changed my banner by using 'shrink to fit'. Worked as you said.
ReplyDeleteBest wishes Lea
Oh that's great Lea ~ so happy it worked out for you, looks fabulous!
Delete♥Sharon