Translate

Showing posts with label image. Show all posts

Wednesday

How to: Install Sidebar Tags

In this tutorial we're going to cover how to install and move sidebar tags on your Blogger blog.  The sidebar area is the column or columns to the side of your main posting area.  The process for working with sidebar elements is surprisingly easy and opens up a world of possibilities for customizing your blog.


Before we begin you'll need to have an image or two, set aside to install on your sidebar.  You can find an assortment of free sidebar tags located within each of my designer blog themes by clicking this title: A-Z Blog Theme List  Be sure to have your image ready to use and in an easy to remember location on your computer.

Once your image is ready we can begin~

1. Log into your blog and navigate to the back area by clicking on "Design"...


2. The back area looks like this...


3. Now click on "Layout" in the left link list...


This is the area we'll be working in to add a few sidebar images.  You layout may look different than mine depending up how you have your blog set up. You can easily change your layout at any time by visiting the "Template Designer".

3a. To add an image to your sidebar area we'll be using the "Add a Gadget" link.  You'll see they appear in several locations within the Layout view...


I find it easier to click the link with the area I want to add the gadget, this helps lesson the confusion that come when you have a lot of sidebar gadgets later on

4. So let's begin by clicking on the "Add a Gadget" in the sidebar area...


5. A pop-up window will appear with a selection of choices....


For those of you who are new to this area, this is how we add all sorts of bells and whistles to our blogs, from the "Followers" and "Subscribe" features to "Labels", "Archives" and "Polls", there truly is a plethora of sidebar goodies.  I recommend taking the time to explore this area further and getting to know some of the tools offered here.

6. For now, we'll scroll down to the "Image" gadget, at the time I'm writing this it's the fourteenth selection down...

 
7. To open the gadget you can click on either the title or the plus symbol...


8. You will now see the options appear for adding an "Image" gadget...


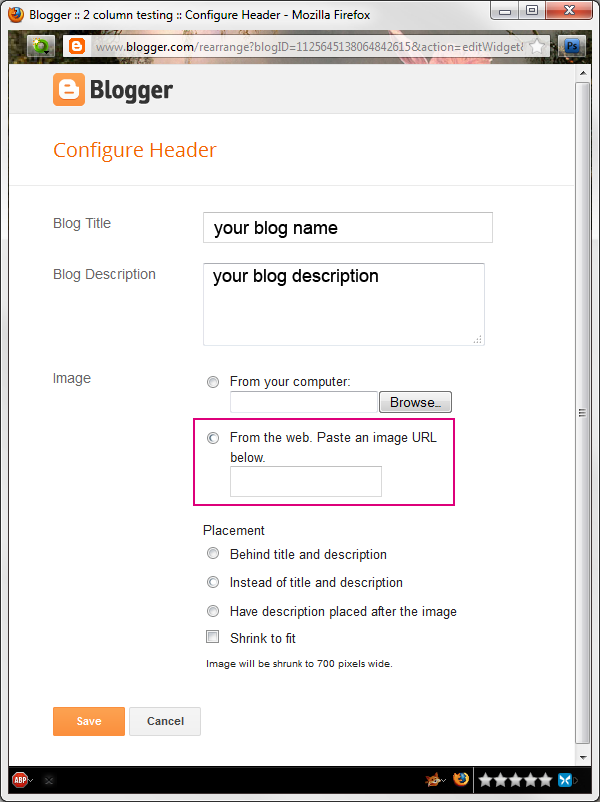
9. Let's read over what the different options are for this section ~

Title - this is where we can title the item which helps when organizing or rearranging your sidebar items.  Leaving this area blank can create a nice clean final appearance to your blog.

Caption - the information typed within this area will appear below the image. A good example is if you're holding a giveaway or sale you can insert the end date in this area.

Link - if you would your image linked to a blog post, page or an outside webpage then this is where that information would go.

Image - this section offers two choices; the "From your computer" option is to upload the image from your computer and the "From the web..." offers you the option of inserting a link so the image will show up.  We will be using the first choice for this tutorial.

Shrink to Fit - the last option is a check box for the "Shrink to fit" option.  This enables you to use a larger image and fit it within your sidebar area.  The size it shrinks down to is dependent upon your own sidebar area settings at the time you're adding the image.  I don't usually use this option myself because all of my free sidebar tags are already set to the standard size of 200 pixels wide.

10. Now, to add an image ~ click on the "Browse" button to navigate to where you have your image/s saved...


11. Click on the image you wish to use...


12. Then click "Open"...


13. Once loaded, you'll see the image you selected appear in the window...


14. You can add any other information you choose and once finished click "Save"...


15. Your new image will automatically be inserted at the top of your sidebar area...


...so if you have other images or sidebar elements there, you'll know the top one is new.

16. If for any reason you wish to change the image you can simply click the "Edit" link to open the gadget window again...


17. Once you have your image uploaded you have the option of moving it to a different location.  To do this simply click on the image gadget and drag it to a new location...


18. When you're finished rearranging your sidebar gadgets be sure to click "Save arrangement" to keep your changes...


19. To view your new changes click on the "View blog" button at the top...


That's it!  You can easily add and make changes to this area at any time by returning and using the steps we just followed above.

Enjoy~

Sunday

How to Write a Blogger Blog Post ~ video

In this post we'll learn how to write a basic blog post in Blogger.  I'm trying a new tool out for this by creating a video tutorial which I've inserted below.  This is my first (ever) video tutorial so please bear with my nervousness until I get comfortable with this new medium.  I will still be creating my written tutorials but they take much longer to create, approximately 4 - 6 hours each, so I will publish them as time permits. In the meantime I hope you find these helpful in trying to navigate Blogger's new interface.

If you would like to view the video in full screen simply click on the video to be taken directly to my YouTube channel.


Enjoy~

Tuesday

How to: Install a Blog Header (Banner Image)

The information below will help you understand the "header" feature of your blog, allow you to make modifications to this area, and enable you to upload a decorative banner image to your blog.

{Before you begin: You should have a banner image already saved on your computer. You can download a free one or purchase one through an online boutique or website. Here is a link to my own designer themes where you'll find a selection of free and low cost banners.

Be sure to save your banner in an easy to find location so you can locate it in the future. I like to save mine in a folder and title the folder "blog images".}

1. Begin by logging into your blog, then click "Design" link found in the top right corner of your blog...


  2. Next click on the "Layout" link in the left side link area...


3. In the next view look for the area with your blog title immediately followed by "(Header)", then click on the blue "Edit" link within this frame...


4. A pop-up window will appear.  Let's go through the list of items you'll see so can get to know this area of your blog...


4. a. In the first and second rectangles you can change the name of your blog and it’s description…


If you’re using a decorative blog header you won’t need to worry about including anything in this area since the information will be included on your banner image, unless you would like a description of your blog to appear directly under your blog header.

4. b. The next area is where you can upload a banner image from your computer…


4. c. Below that is where you can add your banner from an online location by inserting a link…


4. d. Next is the “Placement” area where you can select to have your description or blog title show up in combination with using a banner image…


4. e. Just below that area is the option to shrink the banner image to fit your blog’s layout…


This is helpful if you're planning on using a larger image and don't have the ability to resize the image by using a computer program.

4. f. Just below that, in tiny print, is where you’ll see the size of your current header area based on what template you’re using and how you have that set up…


4. g. And finally at the very bottom are the “Save” and “Cancel” buttons…


Now that you understand all of the features and options for the Header area, let’s install a custom blog header image and make a few selections to be sure it looks it’s best.

5.  We'll begin by choosing whether to click the "Shrink to Fit" option. This choice is only available before you upload your image but if you find you need to change the option you can simply remove the image and reload it again.  So for this example we're going to click on the square to select this option…


6. Next, we’ll upload the banner image ~ to do this click on the “Browse” button...


7. Now navigate to where you have your banner image saved, click on the image and
then click the “Open” button…


8. Your banner image will appear in the window and you can now click "Save"...


9. You have now successfully installed a custom blog banner to your blog. To view your new banner simply click the "View blog" button at the top of the page...


Congratulations!  If you find that your header looks off center or misplaced then please refer to my How to Center a Blog Header tutorial.

Enjoy~