Translate

Showing posts with label feed. Show all posts

Thursday

How to: Setup Blog Posts on Facebook

This tutorial will cover how to setup your blog postings to automatically feed into your Facebook profile or business page. A personal profile is the standard page you receive when you sign up for a Facebook account. A business page is a separate page you can set up that's related to your specific type of business. Note: you must have a personal FB profile in order to set up a business page. For more information on businesses pages visit this link and to create a business page visit this link.

For this tutorial you will need to have a Facebook profile page, and a business page if you are interested in adding your blog feed to that as well. We will begin with adding your blog posts to your personal page and then move on to adding them to your business page.

Setting up Notes on Your Personal Page

To begin, log in to your Facebook profile and go to your profile page...

Next click on this link ~
http://www.facebook.com/editnotes.php?import~to be taken to the "Import Notes" page...
Now enter the url or web address of your blog in the text box ~ be sure you enter the entire address by including the "http://" part so that it looks like this - "
http://yourblogname.blogspot.com...

Next click that you agree to the Terms of Use and click the "Save Settings" button...

On the next page click the "Confirm" button...
That's it! Your previous posts will appear in the Notes area and any new posts you make will automatically show up...

If you have any problems with the process you can view the Notes: Bugs and known problems section on Facebook for support. If you need any other help with Notes, either adding or stopping, visit this help page on Facebook.

Now we'll move on to...

Setting up Notes on Your Personal Page

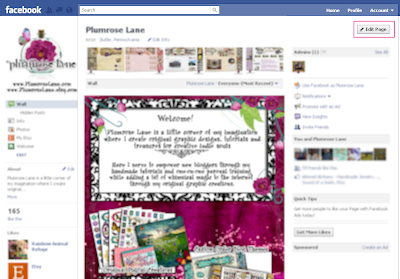
Begin by logging into your Facebook account and navigate to your business page and click on the "Edit Page" button...
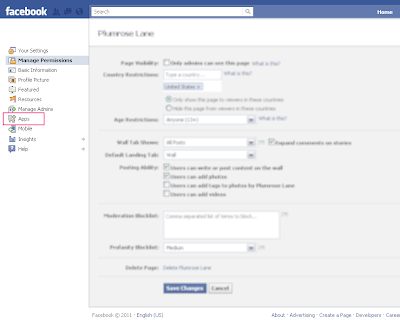
Now click on "Apps" in the left sidebar area...
On the next page you'll see an the area titled "Notes"...
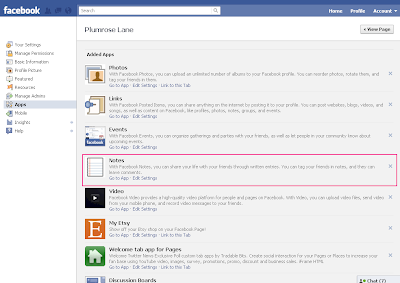
Click on the "Go to App" link...
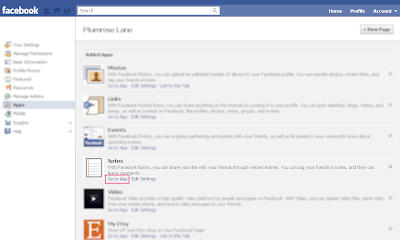
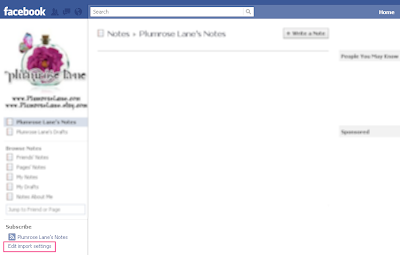
On the next page click on "Edit import settings" found at the bottom of the left sidebar area...
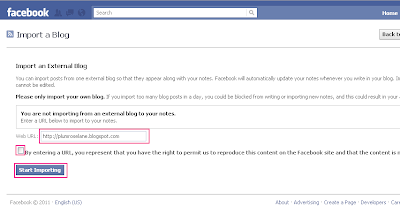
Now, just as you did above, enter your entire blog address in the box (be sure to include the http:// just as I've done in the example below), then click on the check box, and finish by clicking the "Start Importing" button...
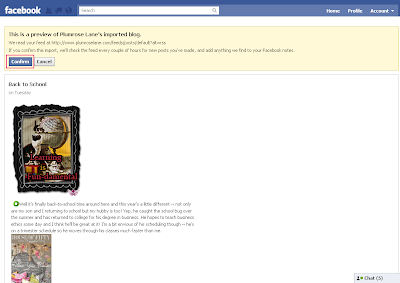
On the next page you'll see a preview of your blog feed, click on the "Confirm" button...
You should now see your own blog posts appear in the Notes section of your business page, just as mine are shown on my page below...
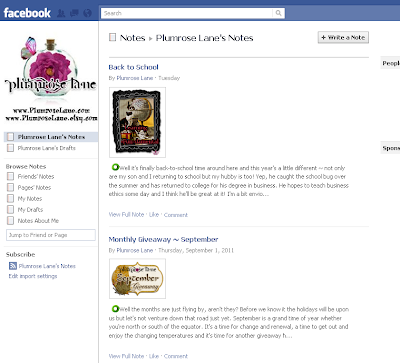
And that's it! You've successfully added your blog feed ~ congratulation!

As with the personal profile section above, if you encounter any issues with adding your blog feed, visit this link for further info.

Enjoy~

post signature

Monday

How to: Link Your Blog Posts to Your Twitter Feed

I can't claim to be an expert on twitter, honestly I find it mostly confusing, but I do have a nifty tool to share for adding your blog posts to your twitter feed. It's especially nice for those of us who don't post on twitter very often because it helps to keep up an appearance of more regular postings on twitter. Having an active twitter feed only helps with increasing a better business following on twitter which can be quite beneficial. And so in this tutorial we will work together using twitter feed to link your blog and twitter account together.

{Special Note: Before we begin you will need to have a twitter profile, a blog and a blog feed set up. If you do not have a blog feed set up yet, simply visit my step-by-step tutorial by clicking here.}

To begin, we will visit http://twitterfeed.com...

Here we will type in our information which can be either your personal name or a business name. Once the information is filled in click the "Create Account" button...

In the next screen we will need to type in a name and the address of our blog feed...

To retrieve you blog feed simply sign into your blog and navigate to the "Design"section (used to be "Layout" tab) and click on the "Settings" tab...

Next click on "Site Feed"...

There you will find your site feed address which you can highlight and right click to copy...

Which you can scroll over to highlight and right click to copy....

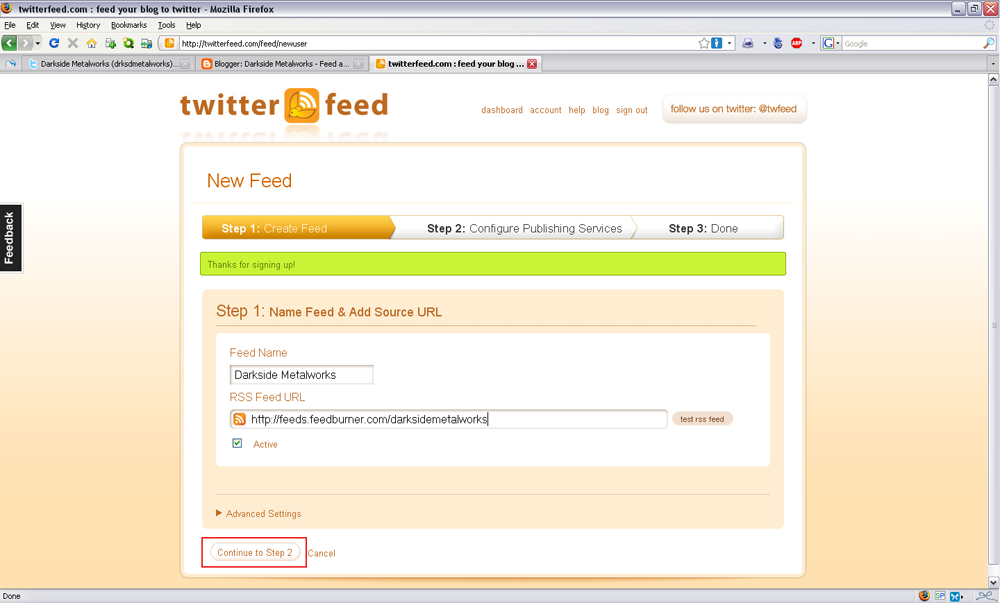
Now we will return to twitter feed where we will paste in the feed url and click "Continue to Step 2"...

With your blog feed set up you will now see an list of available sites you can authorize to receive your blog feed. Here we will set up your twitter to accept your blog feed so begin by clicking on "Twitter"...

On the next screen we will click the large blue button to allow twitter feed to link to our twitter account...

And in the next window we'll click "Allow"...

Once completed you will now see your twitter information appear under Active Services...

When you're finished looking over this page you can click "All Done"...

You're now finished and can click the "Go to Dashboard" button for an overview of your feed and services....

Congratulations! You've now set up your blog to feed into your twitter profile. You can return to twitter feed at any time to set up other features such as Facebook. Don't worry if your latest blog posting doesn't show up twitter immediately as the twitter feed checks updates about every hour so it will show up soon.

Enjoy!

post signature

Now all of my tutorials in one fabulous package for one low price
$10.95 buys the complete set of my digital tutorials
all 25 tutorials in PDF format ~ including my exclusive three part series

"How to Create Your Own Blog Background"

available only with this purchase.

Click the book above to purchase from my Etsy shop..

Wednesday

How to: Setup a Subscribe Button for Your Blog

This tutorial is a continuation of the How to Setup a Feed (Feedburner) for Your Blog. If you haven't already done so, follow the link above to set up your feed before continuing on.

For those of you who are continuing, let's begin...

Special Note:} This tutorial will cover adding an frame tag or image to the sidebar of your blog. You should have already found an image you wish to use and saved it to your computer. If you need help locating and image you would like to use you may visit my Extras page for a list of frame tags.
Additional Special Note:} You will once again need the address of your blog Feed which you used in the last tutorial. You can return to www.feedburner.com/your feed name to view this information again.

You will want to navigate to the "Design" tab (used to be "Layout") and click on "Add a Gadget"...
A pop-up window will appear. Scroll down to the Picture selection and click on either the word "Picture" or the plus sign next to it...

In the next window be sure the "Shrink to fit" is UNCHECKED and then click the "Browse" button...

Navigate to where you have the image saved on your computer, click on the image and then click "Open"...

In the "Link" box type or paste the link to your Feedburner address...

Then click the orange "Save" button...
Your new picture image now appears in the sidebar of your blog. You can move it to a different location in your sidebar by clicking and dragging the box...
Just remember to click the orange "Save" button if you rearrange your sidebar gadgets.

That's it! You now have a button set up on the sidebar of your blog which enables your visitors to subscribe to your blog feed. Congratulations!
Enjoy!

post signature

Now all of my tutorials in one fabulous package for one low price
$10.95 buys the complete set of my digital tutorials
all 25 tutorials in PDF format ~ including my exclusive three part series

"How to Create Your Own Blog Background"

available only with this purchase.

Click the book above to purchase from my Etsy shop..

Tuesday

How to: Setup a Blog Feed - for Feedburner

This tutorial will cover how to setup a feed for your blog. This is an important aspect of hosting a blog as it allows your visitors to subscribe to your blog postings through a number of methods. I often find it easier to keep up to date with blogs I like to read by subscribing to their newest postings via email. This means whenever they publish a new posting I receive an emailed copy of what they published. It's a great way to keep up to date, I can read their blog from the comfort of my email's inbox and then visit their blog at my convenience to leave a comment.

So on with setting up your own blog feed for your blog...

We will be by going to http://feedburner.google.com. There you will see a screen as below...

Begin by typing in the link to your own blog, exactly as it appears on your blog. You can copy it from the browser's address bar from the main page of your blog. Once this is completed click "Next"...

On the next screen be sure to click the bottom radio button next to your blog's name with RSS, then click "Next"...

On the next page you will title your blog's feed and create a feed address...
I like to change the capitol letters to lowercase since it's easier for others to find and lessons the chance for mistakes. Once completed, click the "Next" button...

You will then receive a confirmation that your feed is now live. Click the "Next" button...

On the next page you will see the actual address of your feed. Make a note of this of this or copy it and then click the "Next" button...

On the next page you can add features to your feed. These are all free and help you to track the activity on your feed. I like to add the Click-thrus and Stats as they are useful tools. Once you're finished making any changes, click the "Next" button...

On the next page you will see a list of information. These are all links to handy tutorials which can help you further investigate the other advantages Feedburner has to offer...
Above this area you will also see a list of tabs. This is where you can return to view the Stats and other features associated with your feed...

For now, we just want to add the feed to your blog so we will click on the small feed icon at the top under the title...
Next we will see the actual page where your subscription options are located. Here is where you will want to copy the link for your feed from your browser's navigation bar...
We will now return to your blog to add this information into the back pages of your blog. Go to your blog and sign in if you are not already signed in. Click "Design" (used to be "Customize") from the main page of your blog...
Next click the "Settings" tab...

Then click the blue "Site Feed" under the tabs...

In the box next to "Post Feed Redirect URL" either type in or paste in the address of your feed...
Also be sure the drop down menu above the feed url is set to "Full"...

Once the address of your feed has been entered then click the orange "Save Settings" button...

You're now finished and have successfully set up a feed for your blog. To continue on and add a "Subscribe" button to the sidebar of your blog click the link below...

"How to: Add a Subscribe Button to Your Blog"

Enjoy!

post signature

Now all of my tutorials in one fabulous package for one low price
$10.95 buys the complete set of my digital tutorials
all 25 tutorials in PDF format ~ including my exclusive three part series

"How to Create Your Own Blog Background"

available only with this purchase.

Click the book above to purchase from my Etsy shop..